How Batik Resist Dyeing Works
Follow one hypothetical piece of cotton through wax application, dyeing, and wax removal to see how resist patterns take shape—and where a maker’s choices matter.
Follow one hypothetical piece of cotton through wax application, dyeing, and wax removal to see how resist patterns take shape—and where a maker’s choices matter.
Craft · 7 min read
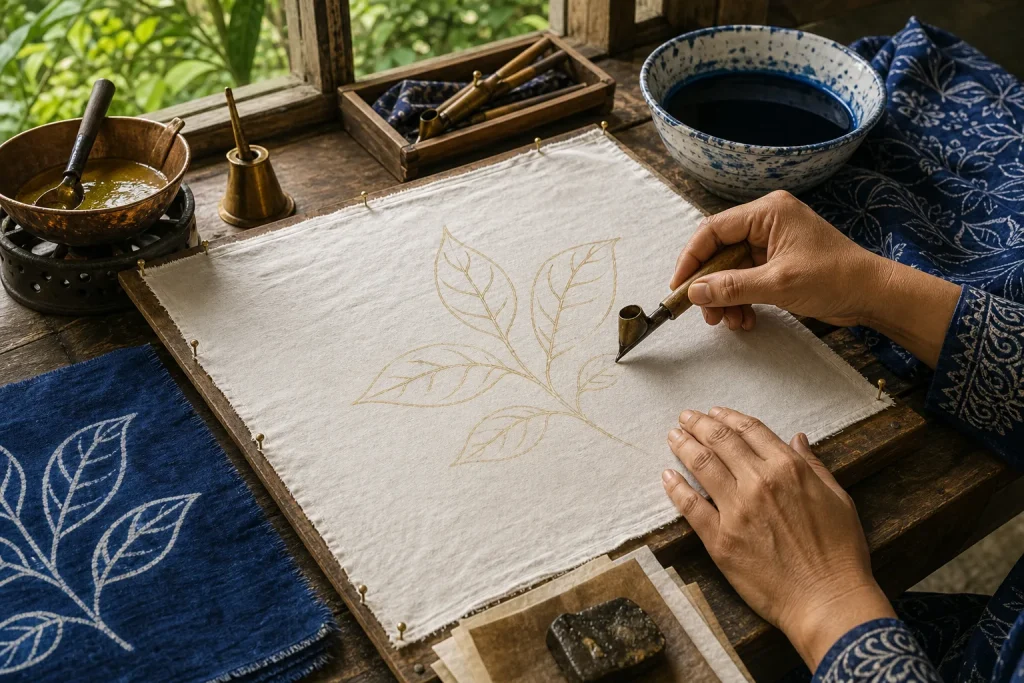
A square of plain cotton lies on a worktable, its edges pinned flat while a maker sketches a loose line of leaves across it. The plan is to keep those lines pale, dye the surrounding cloth indigo, then remove the wax. This hypothetical piece offers a close look at batik resist dyeing—not as a recipe that produces identical results every time, but as a sequence of choices about cloth, wax, pattern, and color.
Begin with cloth that can take an even dye
For this invented project, the maker chooses a piece of clean, undyed cotton. Cotton is a common choice for wax-resist work, though batik traditions use different fibers and methods. The cloth is washed first to remove finishes that might interfere with dye or wax. After drying, it is ironed so folds do not disrupt the pattern.
The material needs to be ready to accept dye where it remains exposed. A factory finish, oily mark, or crease can affect how the color moves. The maker checks the cloth’s edges and decides where the pattern should sit. A border left unpatterned can give the design breathing room; a motif that reaches the edge may feel more continuous. These are design choices, not rules.
In this imagined setup, the cotton is small enough to handle comfortably on a frame or protected work surface. The maker keeps it taut without stretching it. Too much tension can distort the design, while loose fabric may sag as wax is applied.
Choose a resist method for the kind of line you want
Wax creates a barrier that limits dye reaching the cloth. Traditional batik work may use a canting, a small tool with a reservoir and spout that lets a maker draw flowing lines by hand. A cap, a copper stamp, can apply repeating patterns. For this hypothetical leaf design, the maker uses a fine-tipped tool to draw veins and outlines, then a broader applicator for a few larger areas.
The wax must be warm enough to flow through the tool, but heating it calls for care. Hot wax can burn, and suitable temperatures and heating methods depend on the wax and equipment. Before starting, the maker checks the wax label and the equipment manufacturer’s instructions for heating, ventilation, protective measures, and safe handling. The work area is kept clear of distractions, and children and pets are kept away from hot equipment. If those instructions are unclear or the setup cannot be made safe, the maker pauses and asks a qualified textile instructor for guidance rather than improvising.
Wax application controls the shape of the undyed areas. A continuous line can block dye from crossing into a shape, while a gap may let color seep through. That seepage can soften an outline or produce an irregular edge. The maker decides whether to aim for crisp boundaries or accept the small variations that hand-applied resist can bring.
Apply wax with the dye sequence in mind
In the invented project, the maker draws the leaf outlines first, then adds a few interior marks. Each stroke is checked on both sides of the cotton where possible. If wax sits only on the surface, dye may pass through beneath it. The aim is to place enough resist where the pale pattern is intended, not to coat the whole cloth.
After the first wax layer cools, the maker inspects the lines for breaks. A small gap can be filled before dyeing, provided the wax and tool instructions permit the chosen method. This is also the moment to think ahead: if the design will receive another dye bath later, some areas may need another wax application to preserve the lighter color already achieved. Batik is often built in stages, with wax protecting selected areas as successive colors are added.
For this piece, the maker wants pale leaves against a single blue ground, so the plan stays direct. The waxed motifs are left exposed in the intended light areas; the rest of the cloth is prepared for dye. Keeping the design modest makes it easier to follow how resist and color interact.
Let dye color the exposed cloth
The maker prepares a dye bath according to the dye product’s instructions for the chosen fiber. Dye recipes and finishing methods differ, so one general approach cannot serve every colorant. The cloth is immersed and moved gently enough to reduce uneven contact, without pulling at the waxed lines. Exposed fibers take up color; waxed areas resist it to varying degrees.
As the cloth colors, the maker watches for folds or sections pressed against one another. The expected result is a blue ground with the leaf shapes remaining much lighter. The precise edge may show slight variation. Wax thickness, cloth structure, dye behavior, and hand movement all affect the appearance.
Once the color has developed as directed, the cloth is rinsed or otherwise finished according to the dye instructions. The maker does not assume that a quick rinse is enough: the product may call for a particular process to settle the color or release excess dye. The dye directions, including any precautions for handling and disposal, govern this part of the work.
Remove the wax and read the revealed design
Wax removal reveals the contrast hidden during dyeing. The suitable method depends on the wax, cloth, and available equipment. Before choosing controlled heat and absorbent paper, or another removal process, the maker checks the wax product guidance and equipment instructions for safe temperatures, ventilation, protective measures, and disposal. If the guidance does not cover the proposed method, the maker pauses to get qualified instruction instead of experimenting with heat. Wax and dye residues are disposed of as their product instructions direct, not poured down a drain.
After removal and drying, the maker examines the cloth. The leaves may have clean pale centers, while a few edges show soft blue marks where wax coverage was thin. Those marks suggest where wax may not have reached the reverse side. They also give the surface a quality that a perfectly mechanical repeat might not have.
If the maker wants another color, the process can continue. Areas meant to stay pale are waxed again, while newly exposed regions receive the next dye. Each layer changes what can happen in the next bath. Lighter areas generally need protection before darker dye is introduced, since later steps cannot simply restore the original cloth color.
A hypothetical worked example from sketch to cloth
Starting situation: Imagine a maker with a clean cotton square, a sketch of three leaves, a fine applicator, and a blue dye labeled for cotton. Before heating wax, the maker reads the wax and equipment instructions and confirms that the stated heating, ventilation, and handling requirements can be followed in the workspace. The plan is a single-color design with pale motifs, not a multicolor pattern.
Actions: The maker pins the cloth flat, sketches the leaves lightly, and applies wax along their outlines and selected interior veins, following the wax and tool directions. Once the wax cools as directed, the maker checks for gaps on both sides and fills any obvious breaks using the approved method. The maker prepares the dye bath and finishes the cloth according to the dye label. For wax removal, the maker follows the wax and equipment guidance; if those instructions do not support the available setup, the maker stops and seeks qualified instruction rather than applying heat. After the wax is safely removed, the cloth is dried as directed.
Expected result and tradeoff: If the chosen materials and methods suit one another, the cloth should show pale leaf shapes against a blue field, with possible small variations along the edges. Careful inspection may help reveal gaps before dyeing, but it cannot remove every variation. The maker can accept a soft, lively edge or revise the approach on another piece; safety and product instructions take priority over a preferred finish.
What the process teaches a maker
Batik is shaped by decisions made before, during, and after the dye bath. Cloth preparation affects dye uptake; wax placement defines protected areas; application gaps influence edges; and the order of colors determines what can remain light. The revealed design is not simply a drawing colored in afterward. It records where the resist held, where dye reached the fibers, and how the maker chose to work with those effects.
For a first project, a small design with a clear dye plan makes the process easier to understand. Keep notes about the cloth, wax tool, dye instructions, and places where color crossed a line. Those observations can guide a later piece without turning batik into a formula: the next cloth, pattern, and dye may behave differently, and that difference is part of the craft.
Related reading
How Place Shapes a Textile Tradition
Learn to read a cloth through the materials, weather, work, and local habits around it, without…
Storing Folded Fabric to Reduce Wear
A shelf, drawer, or storage box can each suit folded fabric. Choose by checking the textile,…